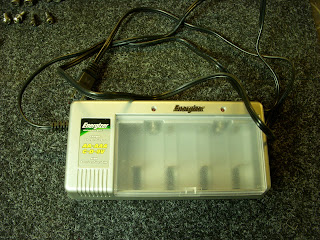
Buying batteries only to toss them into the trash is a complete waste of money and generates a lot of toxic trash. Nothing new there.
So a year or so ago I started converting things over to rechargeable batteries. Energizer seemed like a solid, flexible system so I bought the charger and have been replacing regular batteries with rechargeable ones when they die. After a bit of use I found a very frustrating bug/feature of this unit.
If you leave it plugged in the unit shuts down. Fair enough, isn't using power keeping the transformer energized. But the problem comes when you go to charge again. You have to unplug the unit to re-set the power! So after a year of crawling under my desk to unplug the stupid thing. So I decided a modification was in order. The charger needed a on/off switch. My first thought was to just graft a power switch onto the cord much like a lamp. Would have worked fine and been much faster but isn't as sanitary as a switch on the unit itself.
First I had to remove the four screws securing the back cover. Strangely, they were a simple tamper proof screw?!! I have no idea why they thought this was necessary, maybe they got a good deal on them.
I got out the Dremel and trimmed up a very worn old screwdriver to make my own tamper proof screwdriver! A Dremel is THE go-to tool!
Once I had the back cover off it looked pretty simple. Cord supplies power to a small transformer that steps down the power supply to the circuit board. Magic stuff happens and your batteries are charged. I thought about trying to get a reading on the power out of the transformer and possibly wire the switch between the transformer and board but I didn't want this to become a longer job than I'd already made it. I was also happy to find quite a bit of room around the cord and transformer for the switch.

After a few minutes rooting through my tool box I found this small simple toggle switch. I also had a small roller contact switch that I thought for a moment about installing inside the cover so that opening the cover would switch the unit off. Again, decided against it in the name of time.
Just above the "Energizer" decal you can see where I drilled the hole with the Dremel. Could have used a drill but I already had the Dremel out. Just reamed the hole, then test fit the switch. Repeat until the switch fits!
You can see the hole for the switch from the inside. The cord has a strain relief fitting so the knot in the cord is redundant. Untying the knot gave us the extra cord length we need to tap it.
The cord isn't polarized (one large spade and one small spade on the plug) so really we could cut either wire on the cord. We're only trying to interrupt the circuit so we only have to stop the flow of electricity on one wire. Cords like this usually have small ribs on one of the wires. I seem to remember that on polarized cords, that is the line side. I'll have to check.
 The switched power is rated at 120v but the wattage is very low so I used a couple of small pieces of hookup wire. Stripped both ends first so I wasn't pulling on the wires once they were attached and then did a quick solder job attaching them to the switch. Single pole single throw switch so there is only one way to wire it.
- Installed the switch in the case.
- Cut the wire with the ribs on the side
- Split the now cut wire from it's intact partner.
- Stripped the ends of the cut wire
- Twisted one switch wire to the stripped wire to the transformer, added a wire nut
- Twisted the other switch wire to the stripped wire on the cord, added a wire nut
- Tucked it all back into the case making sure nothing contacted the transformer (they get hot)
- Replace the back cover and curious tamper-proof screws (Laugh to yourself that they didn't stop you for very long)
So here it is. Switch installed in the top, LED lit showing that the batteries are charging. When charged the unit will shut down but now, instead of cursing while I crawl under my desk to unplug the cord to power it down, wait 10 seconds and plug it back in (or cycle the power strip which re-sets the printers and their servers), I can just flip the switch wait a few seconds and turn it back on.
Maybe when I do a bit more work with LED's I'll add an LED next to the switch that will indicate that the power is on.
Don't fear technology! You buy this stuff so don't let them tell you what you can or can't do with it.
Modify Everything!
Todd


No comments:
Post a Comment